

David Tsang
Active Member
If anyone is wanting to swap their 2017 style front console for a 2018 type with cup/drink holders then this is how you do it. Usual disclaimers... you may break things and void warranties and such.
Parts Needed...

Not a lot of parts are actually needed... whilst the above looks complicated it covers every option so you have to be carful when ordering as there are multiple types.
I have made it easy as here are the actual parts needed including the actual EU part numbers:
400 A4476800631 Console
420 A2056800691 Cup Holders
430 A2056830291 Storage Tray
440 A4476891200 Insert
500 A4476890400 Cover Plate
Now the below items are optional... explanation later...
550 A4476890411 Mounting Bracket
580 N000000000815 Tapping Screws 2 off in pack
All the above will cost around £220.

And arrives in a big box!
First step... remove your auxiliary console
Use a flat blade screwdriver to carefully lever the console out at either side...
Just one cable to unclip...

Now lever off the two cover plates holding the console in on either side in the footwells and remove the torx screws... keep the covers and the screws for later you will need them for the new console.
The console should now easily slide forward but will be held by two cables the 12v socket cable and the media unit cable. put your hands inside the back of the console and unclip the cables. the 12v socket cable is awkward as it unclips pulling upwards rather than backwards. once the cables are unclipped the old console can be removed.
Remove the media unit and 12v socket (very tight) and place to one side for later with the aux console two cover plates and two torx screws.

You now need to remove the old bracket held by two bolts.

Now you have a choice... remember I said some parts were optional... well the front bracket would noe be installed in place of the old bracket... however it's installation requires the cutting of the carpet and underlay which is very thick. As the new console is already firmly held at the back and middle you can forgo installing the front bracket. I did not install it and my console is rock solid.
Prepare the new console, you first need to drill a hole in the bottom of your new console around 20-25mm for the cable to the aux control panel to pass through:

Then turn it over and thread some wire or similar through the media hole, 12v socket hole and their respective side ports to help pull the cables back through:
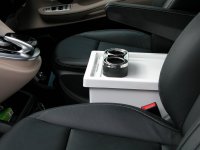
You need to ensure that the 12v cable and the media unit cable are untangled and routed around the vent pipes left and right in order to give them as much length as possible. If you don't route the cables around each the side of the roller unit the cables will obstruct the roller door from opening fully. Slide the console into place and pull the three cables through their respective holes. You can now fit the torx screws and cover plates. The rubber inserts can be placed in the bottom of the console and the drinks holder clipped into place. Route the cable for the Aux console that came through the hole you drilled to exit the rubber mat via the pull tab as there is a space there. Clip the blanking plate into the centre hole (don't screw this in from behind as if you ever want to remove the console in the future it makes it easier to unclip the cables using the central hole. You can now reattach the media unit cable and clip it back in with the SD card slot at the top.
It should now look like this:

Next is where you have to get creative as although the control units are identical in the cars with the fitted drinks holders the bracket that mounts the control unit is factory mounted to the later console and not available by itself. So you can either buy a new console 780 Euros or use a bit of imagination.
I opted for the latter!
Cut the following shapes out of 3mm, Ply, MDF or hardboard. and glue to form a box.

Check the fit... round off all the edges and spray black or cover in vinyl.

It should be a tight fit especially if covered in vinyl and friction should keep it in place. If it is a little loose some double sided foam tape or velcro will hold it at the bottom.

Looks just like the factory fit!")
Hope this may help anyone attempting the same.
Parts Needed...
Not a lot of parts are actually needed... whilst the above looks complicated it covers every option so you have to be carful when ordering as there are multiple types.
I have made it easy as here are the actual parts needed including the actual EU part numbers:
400 A4476800631 Console
420 A2056800691 Cup Holders
430 A2056830291 Storage Tray
440 A4476891200 Insert
500 A4476890400 Cover Plate
Now the below items are optional... explanation later...
550 A4476890411 Mounting Bracket
580 N000000000815 Tapping Screws 2 off in pack
All the above will cost around £220.
And arrives in a big box!
First step... remove your auxiliary console
Use a flat blade screwdriver to carefully lever the console out at either side...
Just one cable to unclip...
Now lever off the two cover plates holding the console in on either side in the footwells and remove the torx screws... keep the covers and the screws for later you will need them for the new console.
The console should now easily slide forward but will be held by two cables the 12v socket cable and the media unit cable. put your hands inside the back of the console and unclip the cables. the 12v socket cable is awkward as it unclips pulling upwards rather than backwards. once the cables are unclipped the old console can be removed.
Remove the media unit and 12v socket (very tight) and place to one side for later with the aux console two cover plates and two torx screws.
You now need to remove the old bracket held by two bolts.
Now you have a choice... remember I said some parts were optional... well the front bracket would noe be installed in place of the old bracket... however it's installation requires the cutting of the carpet and underlay which is very thick. As the new console is already firmly held at the back and middle you can forgo installing the front bracket. I did not install it and my console is rock solid.
Prepare the new console, you first need to drill a hole in the bottom of your new console around 20-25mm for the cable to the aux control panel to pass through:
Then turn it over and thread some wire or similar through the media hole, 12v socket hole and their respective side ports to help pull the cables back through:
You need to ensure that the 12v cable and the media unit cable are untangled and routed around the vent pipes left and right in order to give them as much length as possible. If you don't route the cables around each the side of the roller unit the cables will obstruct the roller door from opening fully. Slide the console into place and pull the three cables through their respective holes. You can now fit the torx screws and cover plates. The rubber inserts can be placed in the bottom of the console and the drinks holder clipped into place. Route the cable for the Aux console that came through the hole you drilled to exit the rubber mat via the pull tab as there is a space there. Clip the blanking plate into the centre hole (don't screw this in from behind as if you ever want to remove the console in the future it makes it easier to unclip the cables using the central hole. You can now reattach the media unit cable and clip it back in with the SD card slot at the top.
It should now look like this:
Next is where you have to get creative as although the control units are identical in the cars with the fitted drinks holders the bracket that mounts the control unit is factory mounted to the later console and not available by itself. So you can either buy a new console 780 Euros or use a bit of imagination.
I opted for the latter!
Cut the following shapes out of 3mm, Ply, MDF or hardboard. and glue to form a box.
Check the fit... round off all the edges and spray black or cover in vinyl.
It should be a tight fit especially if covered in vinyl and friction should keep it in place. If it is a little loose some double sided foam tape or velcro will hold it at the bottom.
Looks just like the factory fit!
Hope this may help anyone attempting the same.